These Videos will Guide you though how to set up JTAG on an XBOX 360 Console.
Source: Troy2062
Note: Before you Try to JTAG your Xbox 360 Console you should Check Whether it is Possible Or Not Here… Check if Your Xbox Can Be JTAG’ed
Here is Another JTAG Tutorial
Xbins will be needed to download programs for this TUT.
JTAG HACK
Requirements:
– Some wire.
– Soldering Iron
– Xbox 360 with kernel version 7371 or lower(Some 7371 consoles may not work if they have the patched CB)
– 2 Switching Diodes. I used 1N914 – 1N4148
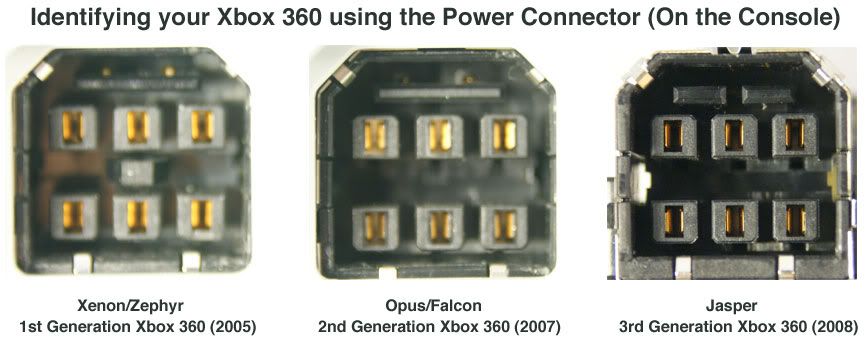
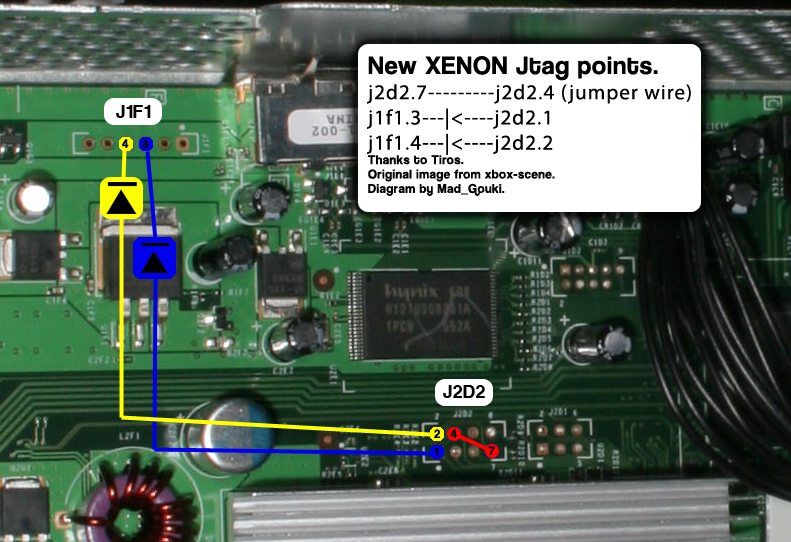
You will need to know your Xbox Motherboard Revision. These are the two diagrams to follow. Each one of these will need to be bridged with a piece of wire and 2 of them require a switching diode.
The |<is> |< of the diode. That will tell you which way to place the diode when installing the JTAG connections.
Xenon Motherboard JTAG Connections
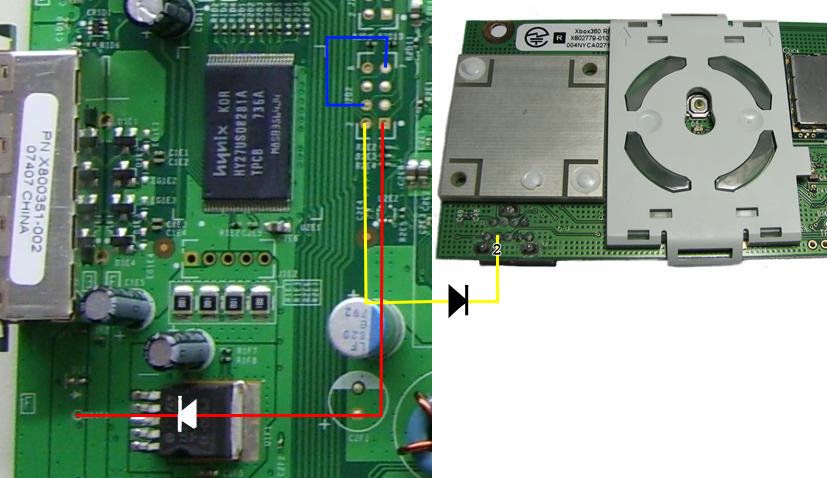
Zephyr, Falcon, Opus, Jasper JTAG Connections
How to Dump the Xbox 360 NAND
Alright now that you have the JTAG connections out of the way its time to install the LPT cable.
Requirements for Dumping the NAND Image
You will need the following to dump your Xbox 360 NAND.
– Computer with a LPT port(Printer port)
– LPT cable with a DB25 Male end.
– 5 100-Ohm resistors. I used 100-Ohm 1/2 Watt resistors
– 1 Switching Diode. I used 1N914 – 1N4148
– Solder Iron
– Some patience
– NandPro20b to dump the NAND
– Total Commander to make sure your dumps are identical
Now dumping your NAND is crucial to this. You want to have a good clean NAND image that can be flashed back to the console if need be. So lets get started.
1. We need to set up the solder connections onto the motherboard. I used a printer cable and cut it midway and spliced it open. Then used a multimeter to figure out which cable goes to which pin. I then wrote the color/pin combination on a piece of paper. If you decide to do the same as me and not make your own cable I suggest writing down the color/pin combo so you don’t have to use the multimeter again.
This is what my printer cable looks like.
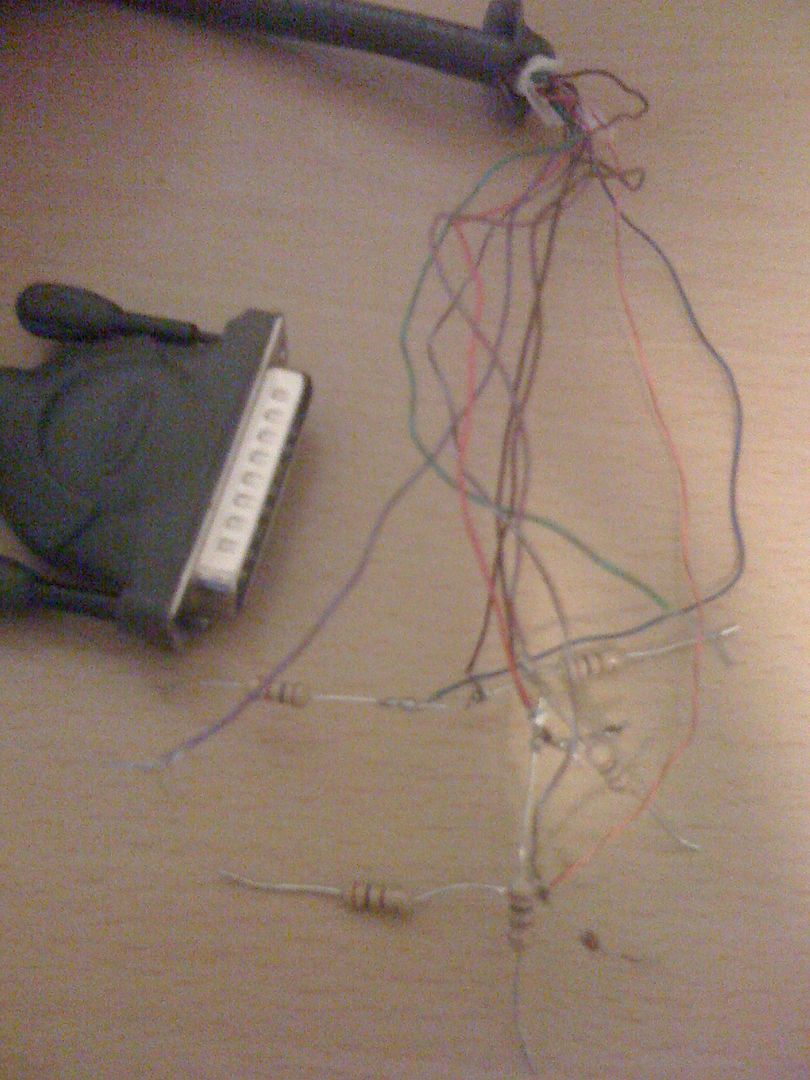
As you can see I have all the resistors soldered to the ends of the cable and the one diode attached as well. All I have to do is solder it to the motherboard and I have my connection to the NAND reading and it can dump.
Soldering the cable to the board.
Now attaching the cable to the motherboard is easy as long as you know how to read the diagram which is pretty straight forward. Just follow the lines. This diagram also shows the JTAG connections. Just ignore that they are there since you already have the diagrams up top. *Diode MUST be soldered directly the the board, will not work in plug housing if you make your own cable!*
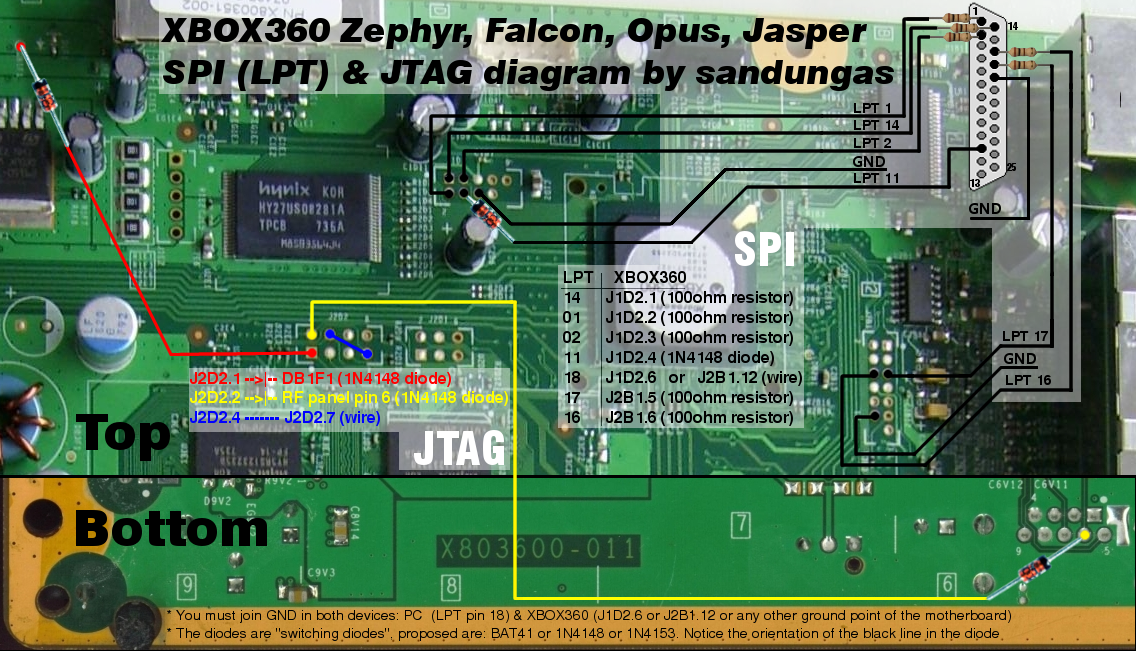
Pin number 18 coming from the LPT cable is shown as ground. This wire should be soldered to either the ground next to where Pin 11 solders to or the ground under where Pin 16 solders to. This will ground it and prevent the 360 from shorting and turning off.
Ok so now that you have the LPT cable soldered to the motherboard and have your cable connected to your PC. It is time to start dumping the NAND. In order to dump the NAND you will need Nandpro20b which can be downloaded on Xbins.
Directory for Nandpro20b is
/XBOX 360/development/kernel/nand tools/NandPro/
Getting files together:
1. Make a new folder and name it Nandpro20b then extract the content of the rar file into this folder.
2. Place the Nandpro20b folder in the root directory of your hard drive.
3. In the Nandpro20b folder there is a prgram called “port95nt.exe” run that to install the drivers. Then you are ready.
NandPro should work with all 32bit OS’s. It is said it works fine with Vista and 7 but may need admin rights and XP Compatibility on.
Anyway lets get to reading your NAND.
Plug the power cable into the back of the 360 and into the wall so it has its power source. But do not turn on the 360 as it is not required. All you need to do is plug in the power cable and continue.
Dumping the NAND:
1. Click Start
2. Select run
3. Type CMD
4. Now in the command window you will need to type the command to read.
C:\Nandpro20b\nandpro.exe lpt: -r16 nand1.bin
5. Click enter and it should start. If it says testing 4 times and fails you need to check your soldering.
6. If done right it will start to read the NAND. It should read to block 3FF.
7. Repeat step 4. You want to have at least 2 dump to compare to each other and make sure they are identical.
*Note that it is possible that your NAND has bad blocks in it. Error(25x) and you keep getting this each time you dump the NAND don’t worry. It is safe to continue because that is just how your NAND image is.
How to check if your NAND dumps are identical.
Download Total commander here.
RapidShare: 1-CLICK Web hosting – Easy Filehosting
1. Open Total Commander.
2. Click File
3. Compare by Content
4. A new window will open. Open on nand dump for file one and open the second dump for file 2.
5. Then click Compare.
6. If it says file are identical you are set to continue. If it does not say that. I suggest you go back and dump 1 or 2 more times.
If your two dumps are identical. Congratulations. You have successfully dumped your Xbox 360 NAND. Now you can continue.
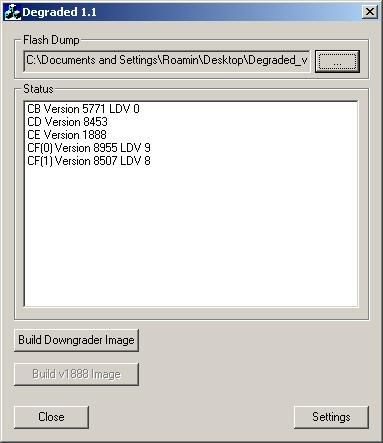
Checking the CB Version
This is a very important step for 360’s with the 7371 kernel. Some of these 360’s have been patched already to stop the JTAG hack. This is the way to make 100% sure whether or not your 360 is still vulnerable.
/XBOX 360/development/kernel/downgrading/
Open your NAND image in Degraded1.1
Your CB version will be displayed.
Exploitable CB versions:
1888, 1902, 1903, 1920,1921: exploitable xenon
4558: exploitable Zephyr
5761, 5766, 5770: exploitable falcon
6712, 6723: exploitable jasper
Non-Exploitable CB Versions (CD = 8453 for all of them)
Xenon: 1922, 1923, 1940
Zephyr: 4571, 4572, 4578, 4579
Falcon/Opus: 5771
Jasper: 6750
NAND wont open in Degraded? Here is how to fix that.
1) Make a copy of your NAND backup
2) Open that copy in a hex editor
3) At offset 0x0012 you will see 2004 – 2007 Microsoft Corporation
4) Change that to 2004 – 2005 Microsoft Corporation
5) Now you image will open in Degraded.
How to Install Xell
Xell is used to grab your CPU Key for your console. Which is a good thing to have in case you need to open your KV. Install Xell is easy and takes little to now time.
First you will need to download it from Xbins. Again here is the directory.
/XBOX 360/development/free60/images/
Download the image for your motherboard revision. Extract and place it in the nandpro folder. Make it easy on yourself and rename the Xell file to Xell
With your LPT cable and everything still set up. You will be using nandpro again. So here we go again.
1. Click start
2. Click run
3. Type CMD
4. Type the command.
C:\Nandpro20b\nandpro.exe lpt: -w16 Xell.bin
Don’t worry about the file size. It is meant to only write to the beginning of your NAND flash.
5. Click enter and it should starting writing.
6. Once it is done writing. Unplug the lpt cable from the PC and turn on the 360. It should boot into a blue screen. If it does then you did it right.
Getting the CPU key.
Have a camera ready to take a picture of the Fuse Set’s that pop up briefly.
Take a picture that includes fuse set 3,4,5,and 6. These contain your CPU key.
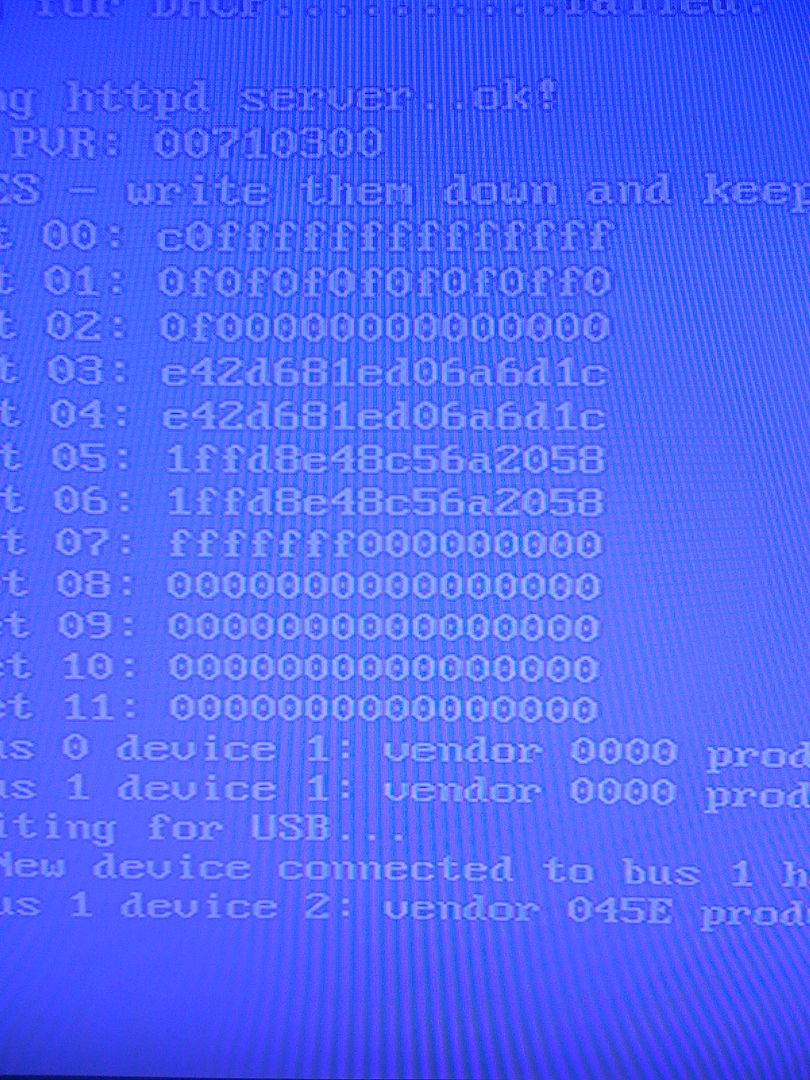
Take either 3 and 5 or 4 and 6. This will make up your cpu key. 3=4 5=6 So for example. I will take 3 and 5.
3= E42D681ED06A6D1C
5= 1FFD8E48C56A2058
So my CPU Key is – E42D681ED06A6D1C1FFD8E48C56A2058
Adding either one of the two will make your CPU key.
After getting your cpu key you can write your original nand image back to the board. Or go straight forward and install XBReboot or freeBOOT.
To flash your nand image back on, use this command
C:\NandPro20b\nandpro.exe lpt: -w16 (name of your nand backup)XX
View More Xbox 360 Mods and Hacks
September 4th, 2010 at 9:29 pm
copier!!!!! You copied the exact same thing at http://gamerglitches.com/system-mods/jtag-xbox-360
September 6th, 2010 at 11:58 am
I added the source at the top 😉
December 9th, 2010 at 6:57 pm
This is from my youtube at Troy2062 in the first place you can even check date uploaded. So please change source to my youtube channel Troy2062
December 9th, 2010 at 7:01 pm
Please also get the other website to take off if posible
December 9th, 2010 at 9:23 pm
Alright, I put a link to your YouTube Channel. Sorry about that.